The first thing you do is wash, dry, and spray paint (red) any size can you want. Other materials you will need are:
- acrylic paints (flesh, black, white, pink)
- small paint brushes
- white cotton fabric
- artificial holly leaves & berries (cheap ones will do)
- small red pompom
- small gauge wire (I used stem wire from the floral dept. at Wal-Mart)
After the paint is dry, it's time to begin the "fur" for his "hat" and his beard. I cut the cotton fabric in strips of various sizes, depending on size of the can. Here I am beginning on the fabric that will go above the face. I folded and glued a strip and then used hot glue to attach it to the can.
Next I begin the beard. Strips of various sizes are cut, then folded over. I don't worry about the strips being cut straight. I fold the top of each folded strip into a point...don't know why, just the way I started and it's worked!
I begin on the right side (I'm right-handed) and hot glue the strips all around the face, making it as full as I like.
Next comes the moustache. A longer strip is folded in half, then tied to make a knot in the middle. I snip the folded end and hot glue it under the nose. He's beginning to look right cute, I think!
I finish him up by gluing three holly leaves and berries to one side and a red pompom to the other.
The final step is to make and attach the handle. The floral wire is very easy to work with.
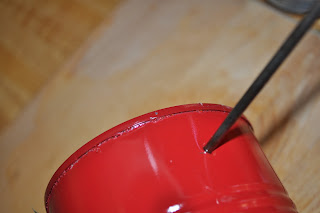
I use an ice pick to make a hole on each side. (My husband just watched me do this and told me what I was doing was very dangerous! He's probably right. He suggested I use my drill to make the holes....but I'm too lazy to get it out...maybe next time.)
As you can see I then push the wire from the inside to the outside. I use a pencil and wrap the wire around it and this keeps the wire from slipping back out.
They are a little time consuming to make but not difficult at all. I usually spray paint several cans at once and then after drying complete two at a time in about an hour.
Filled with candy, cookies, or small treats, I think this little guy can make some cute Christmas gifts. If you try one, be sure to send me pictures!


Cheryl..you have me digging the cans out of the garbage from tonight's meal..these are so cute!! I will try them next week.Adorable..so smart!
ReplyDeleteI mailed your little gift..Friday.
Hugs Cindy from Rick-Rack and Gingham
That is seriously toooo cute. i know you don't think you are an artist, but I beg to differ!
ReplyDeleteCarol
This would be a fun project for a youth group to do and then fill with either candy or even something non edible and take to a nursing home for the residents...very clever! Thanks for the instructions along with pics..you are artistic!
ReplyDeleteOK now -- you had me bluffed pretty good. You do TOO have talent. These are absolutely darling. What a sweet Santa. I'm going to do this and give you full credit. You should link this to my Boardwalk Bragfest going on now. Then you will get more comments and pretty soon you will realize that you ARE talented!
ReplyDeleteVery cute and wonderful way to recycle cans and brighten someone's day ;)
ReplyDeleteThat is just so cute Cheri!
ReplyDeleteIf I get time I am going to give it a whirl!
And your tutorial is really good. I can see the teacher in you here!
And your way more artistic than I ever could hope to be!
Hugs,
Cindy
Oh my dear Cheri! That is the cutest darn little Santa can! I am with Cindy, I gotta go digging in the garbage:) I thing that homemade gifts are the best gifts and I will be giving this a try for some special friends:) Have a blessed day and thanks for sharing this tutorial! HUGS!
ReplyDeleteCute! I've seen these with the puffy paint, but I think the fabric makes them even cuter!
ReplyDeleteBlessings,
and Happy Early Christmas,
Ava
That is so cute. Love the holly and berries on his hat.
ReplyDeleteWhat a sweet and fun idea!
ReplyDeleteThose are precious!!!! Such a good idea - I'm always looking for things to give candy and cookies in but who want's to spend $5 on a container - these are great!!
ReplyDeleteVery clever and easy. I can see most of it as a project for children, except the icepick or drill idea which should be adult work.
ReplyDeleteWicked cute! Nice tutorial.
ReplyDeleteThese are incredibly cute, Cheri! I've never done anything quite like them so am eager to try. Not sure if I'll manage it for Christmas..so close now!..but wouldn't they be lovely modified for Easter and other holidays? Thanks for explaining everything so well and including lots of pictures...:)
ReplyDeleteLynette
Clever girl. Adorable....My mom made these back in the 70's for my kids and to sell at Bazaars. I think she must have used white yarn though.
ReplyDeleteSuper cute idea! I recycle my cans - but, a few of them are coming back home with me!!
ReplyDelete